How to use WSDIS ?
Web based
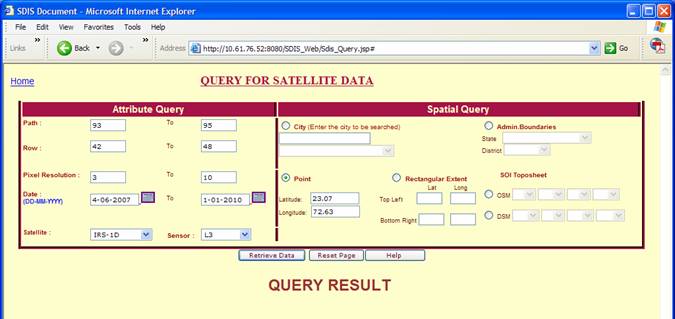
Satellite data Information System (WSDIS) is a web application
that allows user to search the data on the basis of various satellite parameters
and spatial extent. It also has functionality of searching toposheets(digital
and physical). On clicking search satellite data user
can search the data based on :
(1) Attribute Query and / or
(2) Spatial Query.
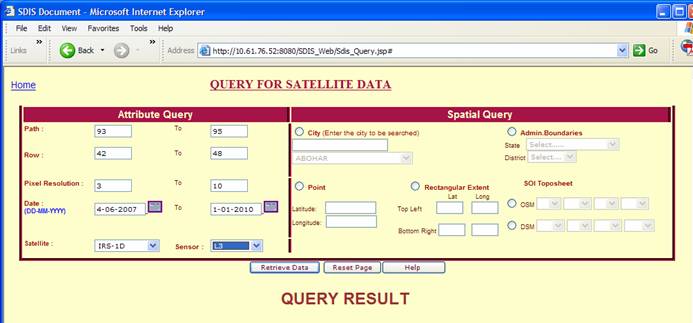
(1) Attribute Query includes search by selecting one or more
satellite parameters like :
1. Path 2. Row
3.
Pixel resolution
4. Date
(of pass)
5.
Satellite
6. Sensor
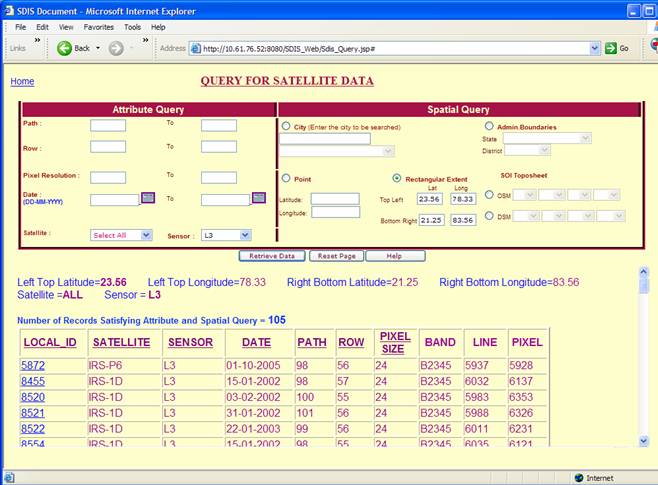
(2) Spatial Query retrieves satellite data satisfying spatial
extent based on any one of the following criteria :
1. City – where user can type the city name in
text box or select city from combo box.
2.
Point – where user can provide Latitude and Longitude of
the point in degree decimals.
3. Rectangular Extent - by providing top-left and
bottom-right corners in decimal degrees.
4. SOI toposheet number - Open Series Map (OSM) or Defense Series Map
(DSM) of Survey of India (SOI).
5. Administrative Boundary - State or District.
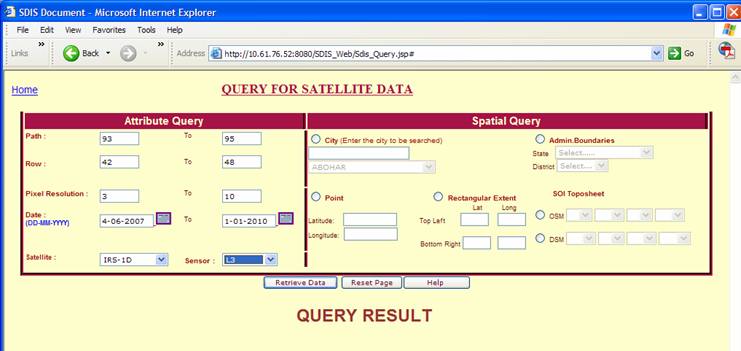
Clicking "Reset Page" button sets the page to its initial state, i.e. without ant query parameters.
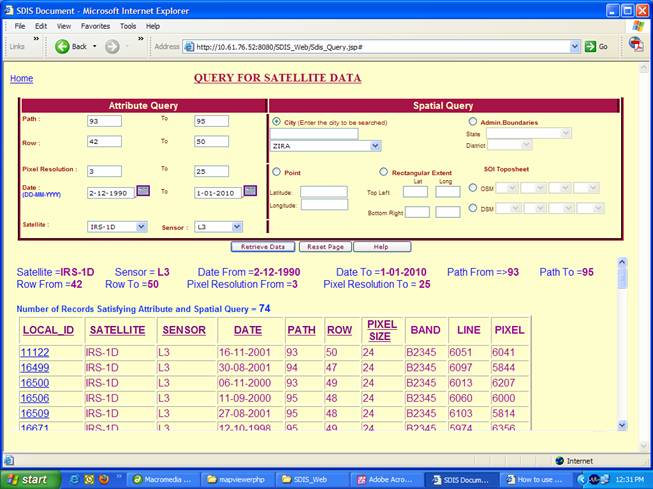
è On clicking
"Retrieve Data" button, data satisfying the query opens in a new
window. The choice of attribute and spatial query parameters are shown on the
top. Number of selections is also displayed.
è One can also sort (A/D)
the data based on any satellite parameters by clicking on the title of desired
parameter.
è For getting more details including thumbnail of particular satellite data, user can click on the link of that local_id.
è User can also
download the data from the download link provided at the bottom
Path :
![]()
- Path number of satellite data to be provided in ‘From’
and ‘To’
boxes.
- Satellites data having path number >= ‘From’ and <= ‘To’ are
selected.
- Absence of any number indicates selection of all
paths.
- If ‘To’ column has a number and there is
no entry in ‘From’ column, then all paths <= ‘To’ are
selected.
- If ‘From’ column has a number and there
is no entry in ‘To’ column, then all paths ³ ‘From’ are selected.
Row :
![]()

- Row number of satellite data to be provided in ‘From’
and ‘To’
boxes.
- Satellites data having row number >= ‘From’
and <= ‘To’ are selected.
- Absence of any number indicates selection of all
rows.
- If ‘To’ column has a number and there is
no entry in ‘From’ column, then all rows <= ‘To’ are
selected.
- If ‘From’ column has a number and there
is no entry in ‘To’ column, then all rows ³ ‘From’ are selected.
Pixel Resolution
:
![]()

- Pixel Resolution (m) of satellite data to be provided
in ‘From’ and ‘To’ boxes.
- Satellites data having pixel resolution >=
‘From’ and <= ‘To’ are selected.
- Absence of any number indicates selection of all
resolution.
- If ‘To’ column has a number and there is
no entry in ‘From’ column, then all resolutions <= ‘To’
are selected.
- If ‘From’ column has a number and there
is no entry in ‘To’ column, then all resolutions ³ ‘From’ are selected.
Date:
![]()
- Date of satellite data to be provided in ‘From’
and ‘To’
boxes, in the format of DD-MM-YYYY.
- One can select the date using date icon also.
- Satellites data having date >= ‘From’
and <= ‘To’ are selected.
- Absence of any number indicates selection of all
dates.
- If ‘To’ column has a number and there is
no entry in ‘From’ column, then all dates <= ‘To’ are
selected.
- If ‘From’ column has a number and there
is no entry in ‘To’ column, then all dates ‘From’ are
selected.
Satellite / Sensor:

![]()
![]()
![]()
- Choice of Satellite should be selected from
drop-down menu containing the list like IRS-1A, IRS-1B, IRS-1C,……...
- ‘Select All’ option selects data from all the satellites
- Choice of Sensor should be selected from
drop-down menu containing the list like L1, L2, L3, L4, WIF, AWF,……...
- ‘Select All’ option selects data from all the sensors.
City
– where user can type the city name in text box or select city from combo box.
![]()
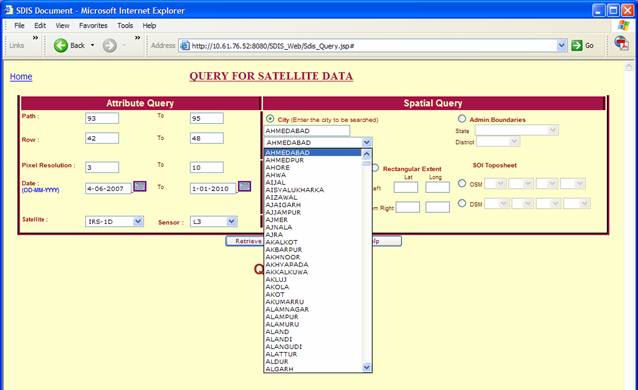
- The user can enter the city to be searched in the
box. The names will appear in the combo box in a sorted way and the user
can click on the desired city. One can directly select the desired city
from the combo box which contains the sorted names of the city.
- The Latitude and Longitude of the city are displayed
in the box of ‘Point’ option for the convenience of the user.
Point
– where user can provide Latitude and Longitude of the point in degree
decimals.
![]()
- The user can enter the Latitude and Longitude in
decimal degrees in the two boxes provided near the ‘Point’ option.
- The satellite data covering this point will
displayed on clicking the “Retrieve Data’
Rectangular Extent -
by providing top-left and bottom-right corners in decimal degrees.

![]()
![]()
- The user can enter the Top-Left and Bottom-Right
corners as Latitude and Longitude in decimal degrees in the four boxes
provided near the ‘Rectangular Extent’ option.
- The satellite data covering this rectangular
region will displayed on clicking the “Retrieve Data’
SOI toposheet number - Open Series Map (OSM) or Defense Series Map
(DSM).
![]()
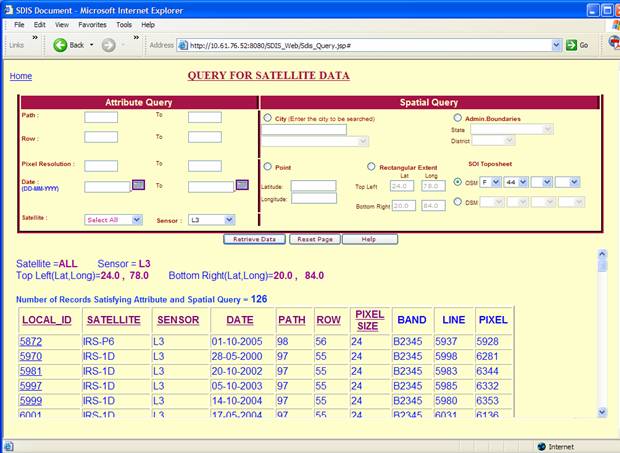
- The user can choose any one of the SOI toposheet
index (i) Open Series Map (OSM) or (ii) Defense
Series map (DSM) using the radio button.
- OSM and DSM map number can be selected using the
four drop-down list boxes. The top-left and bottom-right corners of the
selected map are also reflected in the text-box of ‘Rectangular Extent’.
- User can select any map scale from 1:1000000,
1:250000, 1:50000, 1:25000 by appropriately choosing the map number.
- The satellite data covering this Map will
displayed on clicking the “Retrieve Data’.
Administrative
Boundary -
State or District.
![]()
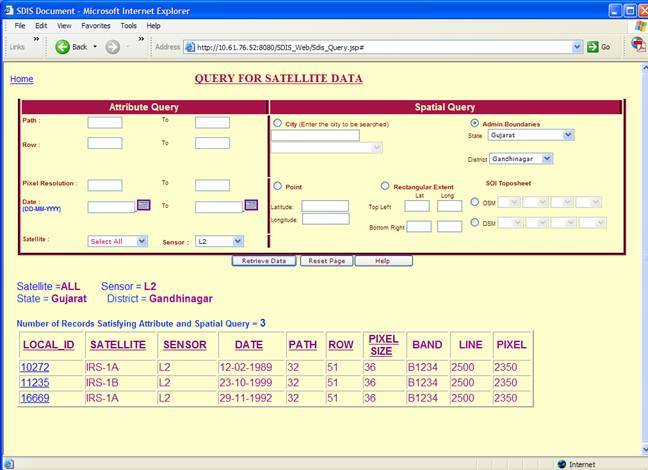
- The user can choose State / District boundary
for searching the data.
- State of the choice can be selected from the
drop-down list in ‘State’.
- The satellite data covering this ‘State’ will
displayed on clicking the “Retrieve Data’.
- In case of the choice of the district, the state
has to be selected first. The district of that state will be available in
the drop-down menu of ‘District’. The district of choice has to be
selected from the list.
- The satellite data covering this ‘District’ will
displayed on clicking the “Retrieve Data’.
Display of query result :
![]()
![]()
![]()

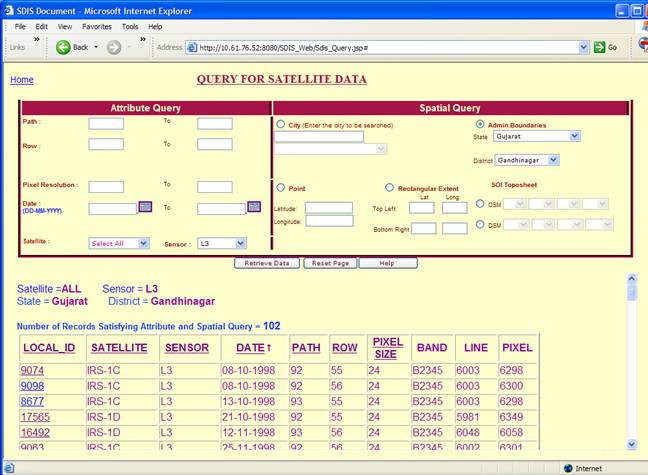
è The choice of attribute
and spatial query parameters are shown on the top. (e.g
Satellite=All; Sensor=L3; State=
è One can also sort (A/D) the data based on any
satellite (e.g.
Date)
parameters by clicking on the title of desired parameter.
è
For
getting more details including thumbnail of particular satellite data, user can
click on the link
of that ‘Local_ID’. (e.g. 16492) as shown below :
è User can also download
the data from the download link ‘Click Here To
Download zip file of Satellitedata having local_id=16492’.
The winzip file of
the raw data will be downloaded, if it exists, after a proper authentication.
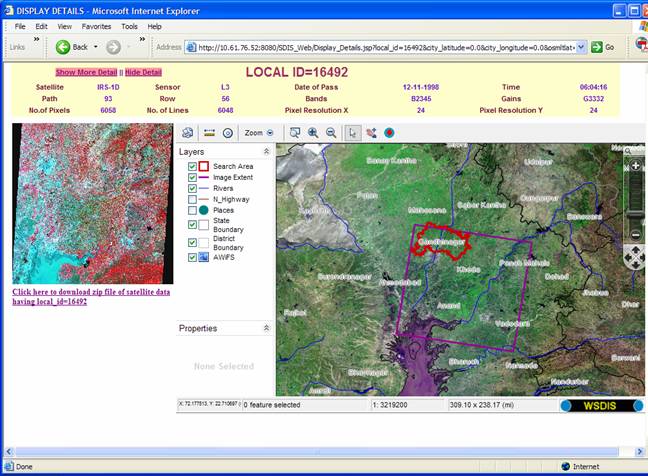
è ![]() ->
Clicking on this button Image extent is drawn. Search Area/Search Point are the
spatial query parameters (e.g. Choosing district Gandhinagar
as spatial query parameter to search satellitedata
will be displayed as Search Area )
->
Clicking on this button Image extent is drawn. Search Area/Search Point are the
spatial query parameters (e.g. Choosing district Gandhinagar
as spatial query parameter to search satellitedata
will be displayed as Search Area )
è
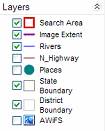 User can Overlay layers like N_Highway,
Places, District Boundary etc. by clicking on checkbox.
User can Overlay layers like N_Highway,
Places, District Boundary etc. by clicking on checkbox.
![]()
![]()

![]()
![]()


![]()
![]()
![]()

à![]() On checking this check box “AWiFS”
Raster image of
On checking this check box “AWiFS”
Raster image of
Downloading Data
:
- User can also download the data from the download link
- Click on the button
‘Download zip file’
file’ to download zip file of Satellite data having local_id=24461’

- Select your Payroll number as User Name (e.g. AC06219) from the drop-down menu.
Name, Division, Designation and phone numbers will be displayed automatically. Enter your password
and click ‘Submit’ button
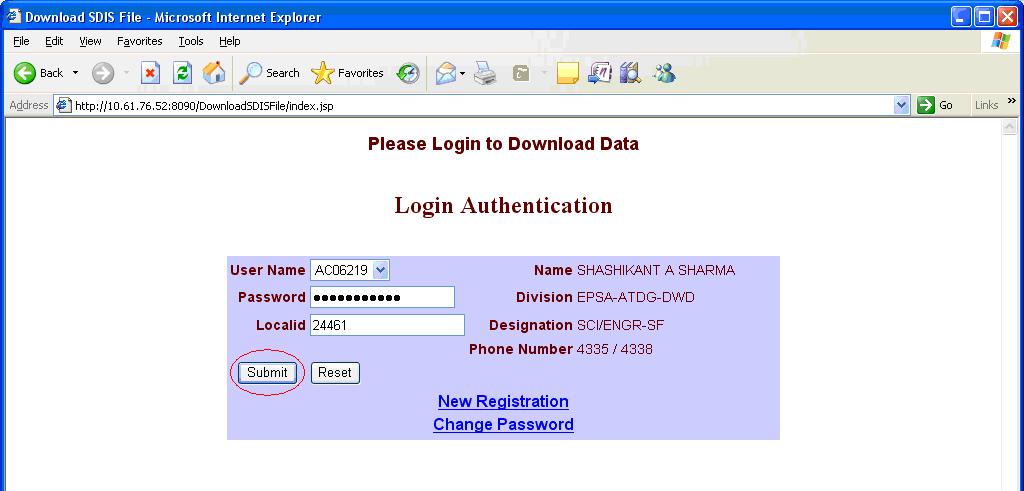
- Clicking the ‘Submit’ button, allows the user to download the required data. A
fter proper authentication the user will get the following page :
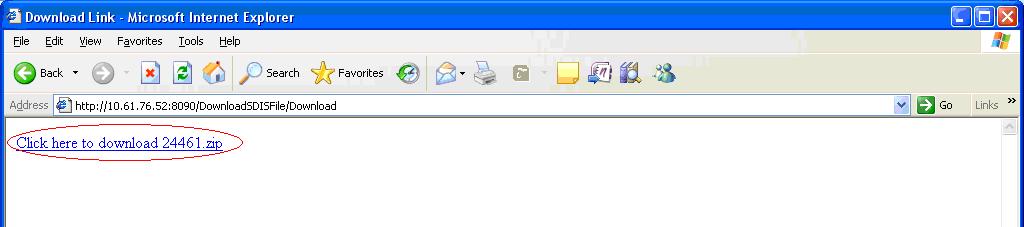
- Click on the hyperlink
‘Click here to download 24461.zip’
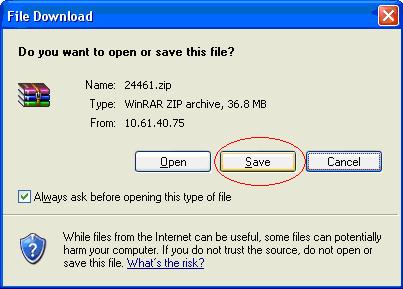
- Click on the
‘Save’
- In case of new user, the user is required to register once using the link
‘New Registration'
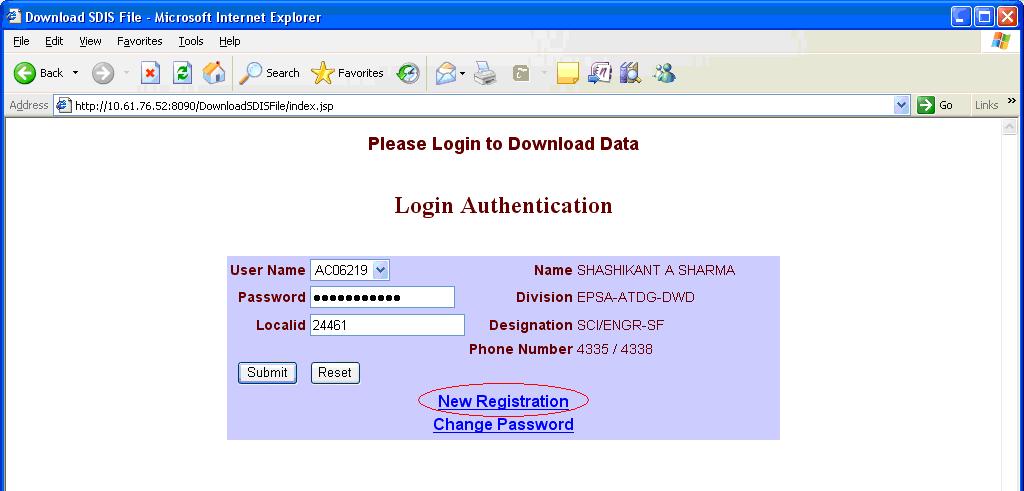
- The user can also change the password using the link
‘Change password'
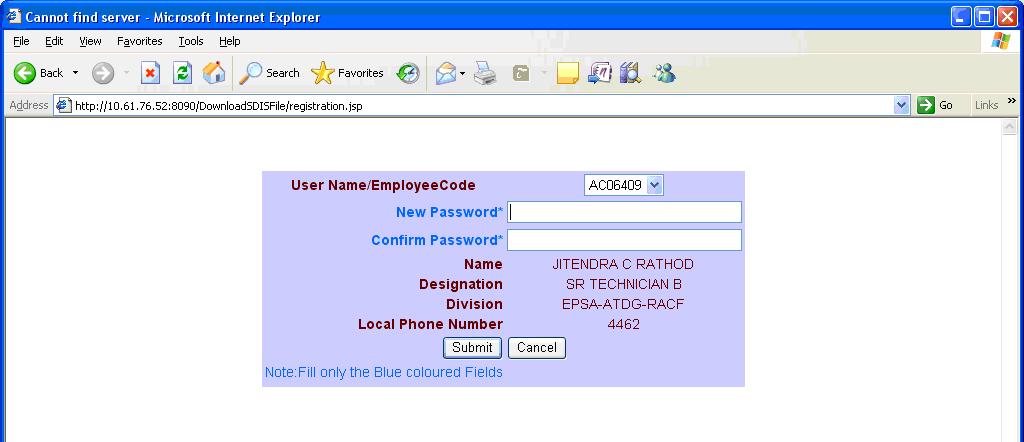
- Select your Payroll number as User Name (e.g. AC06409) from
drop-down menu. Name, Division, Designation and phone numbers will be displayed
automatically. Enter the password in
‘New Password' and retype to confirm in
‘Confirm password' The user will be
registered for access to download data.